Behind the scenes of development process

Champion Master
3 April 2020
A little here a little there
1 August 2020
Welcome in a new Development Diary post of the adventure game – The Descendants of Volos!
If you haven’t read the previous posts yet, here they are:
Post 1 – Game announcement
Post 2 – World map and Tutorial
Post 3 – Event cards
Post 4 – Equipment
Post 5 – Enemies and Combat
Post 6 – Dungeons
Post 7 – Setting up a player character
Post 8 – Character Portraits
Post 9 – Grand Changes
Post 10 – Intellect and Snaaga
Post 11 – Generated Quest Sequence
Post 12 – New Old Cards
Post 13 – Factions and Achievements
Post 14 – Champion Master
Hi! Today we’re going to talk a bit about our workflow. Why? Making a game with such a huge content is quite a challenge. How to make sure that there are no bugs like bad naming, issues with translations, and tons of inconsistencies? Many developers use graphical tools like Photoshop (or it’s alternatives) to design their cards. It means they make an entire card in a graphical tool. There are some good programs (created mainly for a specific thing, like for example interface designs) that could be reused for board game development too. They all work well when doing smaller projects. But we knew that our case required something more. So we decided to create our own development “pipeline”, and our own tool of which we have full control and ability to add any feature at any time.
We’ve created our own software that we call “Spinning Dice Tools”. At the beginning it was a very small tool called from the command line, but, after some time, it evolved into quite a monster.
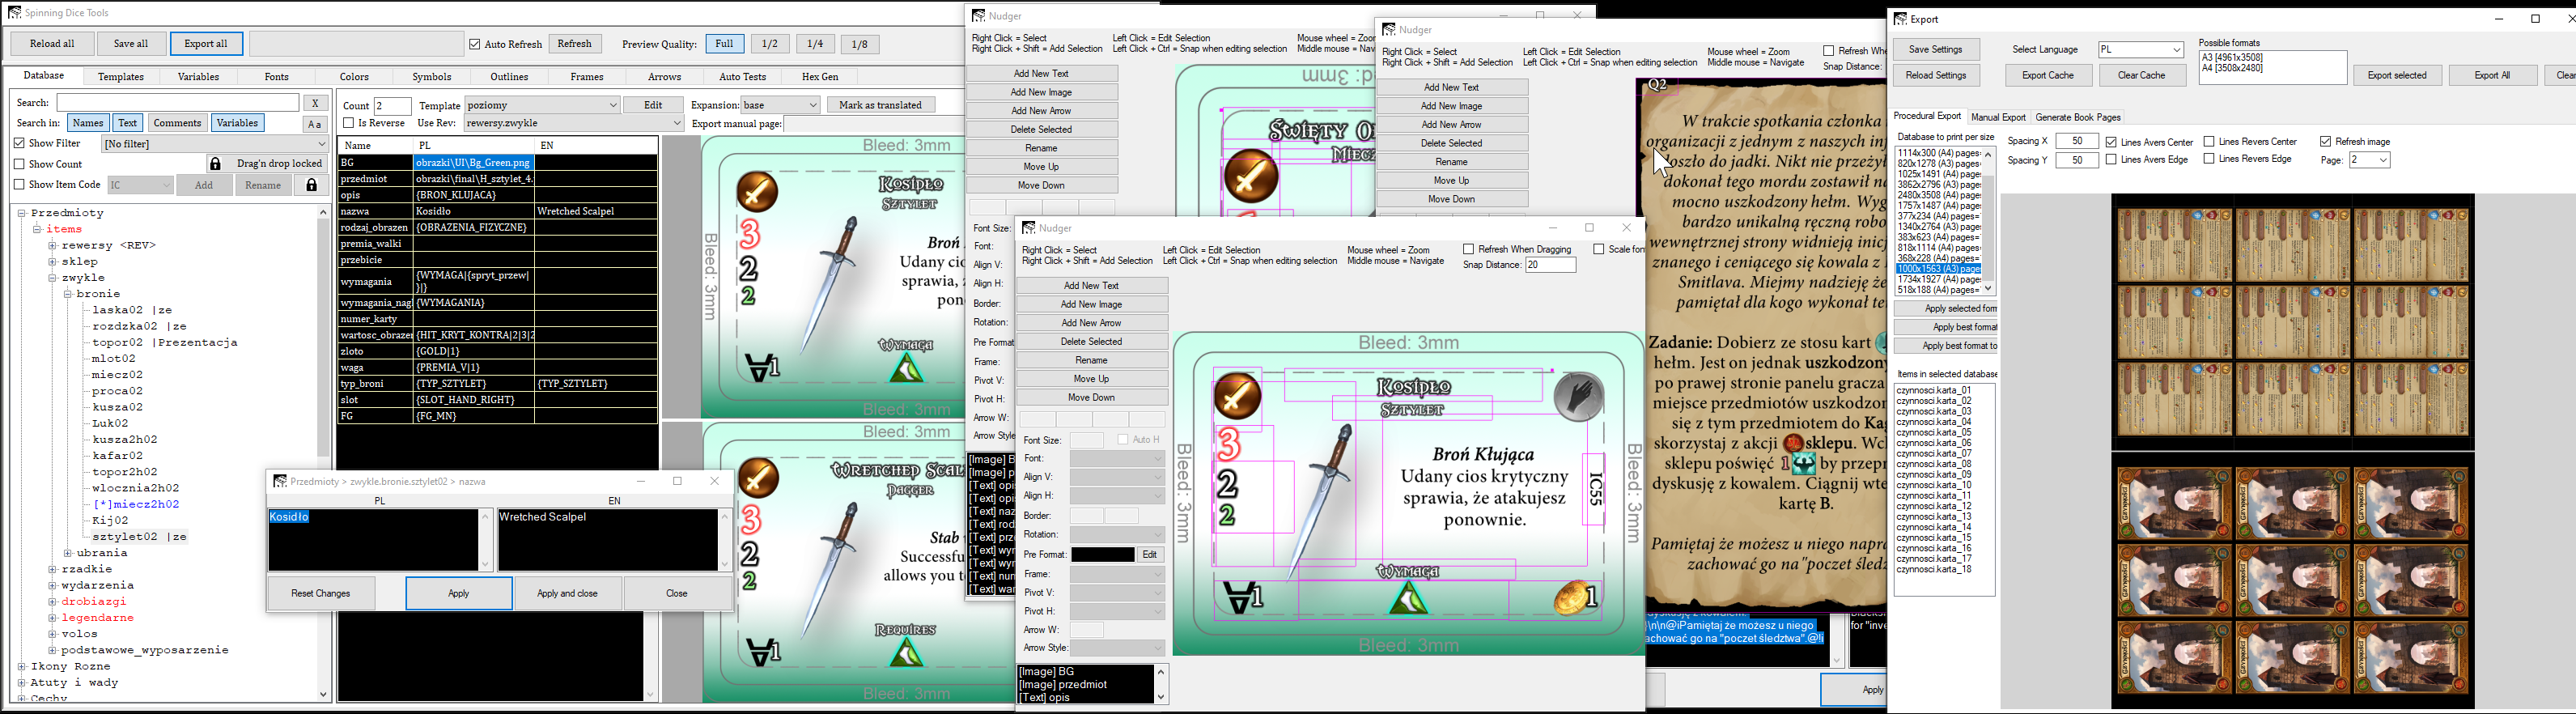
We admit that the user interface looks bad, but in fact it’s as powerful as ugly looking 😉
Lets begin with the first and the biggest difference between this and any other graphical tool…
Contribution
The biggest problem when working with graphical files is the ability to work on the same card or item at the same time by more than 1 developer. Most developers use some sort of a file versioning system, like git, svn etc. When making changes to the Photoshop binary file, you must lock the file so that other developers are not able to edit it until you’re done working with it.
Say an artist is drawing an image for a card representing an enemy. A tester would like to tweak it’s damage values, while another developer would like to translate the skill into another language. They can’t do it at the same time, otherwise they’ll have a “merging conflict” that very often is hard to resolve. When working with binary files, we’re talking here about the loss of someone’s work.
Our tool works on databases as text files which are easy to automatically merge by any contribution software. The conflict may happen only if two developers edit exactly the same thing at the same time – but that’s an internal communication issue. Let’s say I’m changing the critical damage of an enemy from 4 to 5, but my colleague is changing it from 4 to 3 – a conflict in the file versioning system will tell us that we seriously need to talk 🙂
Disc Space
Working with graphical files means that every time you make a change in it (even if it’s just 1 pixel), you need to push it to the file versioning system so that the development progress is not lost, and your changes can be seen by other contributors. Pushing graphical files that very often are 50-100MB or even more means that the system is going to store a duplicate in the history. You’d better make sure that your server has a lot of hard disk space.
Our tool works in a deterministic way. It means that it reconstructs the card (or a punch board token or whatever graphical item it is) from multiple files (art images, icons and text databases) in order to present it on the screen. So if an artist changes an icon that is present on hundreds of cards, then only that icon is pushed to the server. Everyone will see it updated when browsing through the databases. Exporting the final cards to the actual graphical files happens only when we want to prepare things for print, but we never push those cards to the server. There is no need to do that.
Templates
When you start making your own new game, you might want to have it’s content done as quickly as possible, without wasting time on making cards pretty. Once you have them, play test play test play test… Then at some point you want to make cards pretty, but… You don’t want to spend lots of time fixing each card manually, right? That’s where a “templates” option comes in handy. First you design a template of for example an item card. It doesn’t have to look good. The only important thing is the information you put on it, like text fields, image anchors, etc… Then you fill up the fields for every card that uses this template. And if you want to change its look, you just move around some fields, change the background image and voila. All item cards now have a new look.

In the above animation, you can see how changing a card works if you want to use a different template – horizontal or vertical. After applying a new template, all data like texts, icons, images, etc. are carried over so all information is in the correct place, though differently placed around.
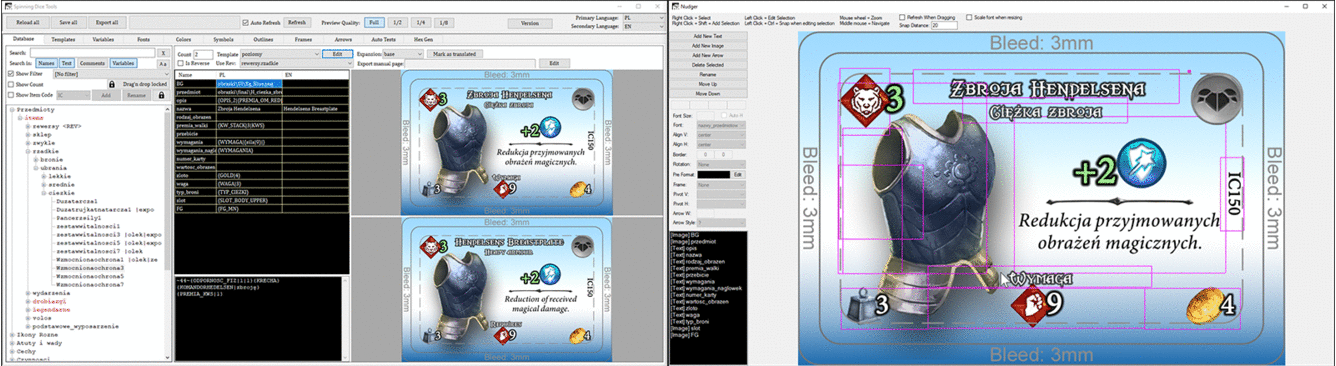
Yet another example – above you can see how editing some text field alignment affects all cards that use the same template.
Translations
Another problem when working with graphical tools are translations. With every language support, you must duplicate the amount of graphical files. Imagine that you’ve received translated cards from translators, but you’ve discovered a bug in the primary language and decide to change the original text. You must remember to re-translate it. It’s very easy to mess things up, and end up with inconsistent translations.
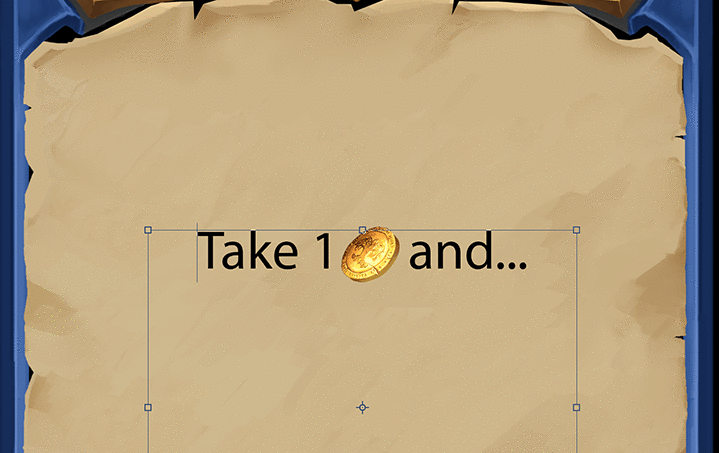
Our tool keeps track of changes made to the primary language.
![]()
![]()
Every time you change some text in the primary language (in our case it’s Polish), the English version lights up as red. It means that translators must have a look at it, to make sure that it still matches the original. In the above example, the change in Polish says “take 3 adventure cards” instead of 2. The English field lit as red to remind that you need to make that change in English too.
Icons and Text Formatting
When using a graphical tool like Photoshop to design a card with text that contains icons in between the words, you must do some tricks. One way is to edit your system font file (for example Arial.ttf) and add icons into some unused glyphs as vector graphics. But then, you must make sure that the same (and up to date) system fonts are installed on every developer’s computer. Well, you could also manually insert icons between the words in the text field, but good luck maintaining its position when the text changes:
The above animation shows an example of some maintenance problems when mixing text with images in graphical tools.
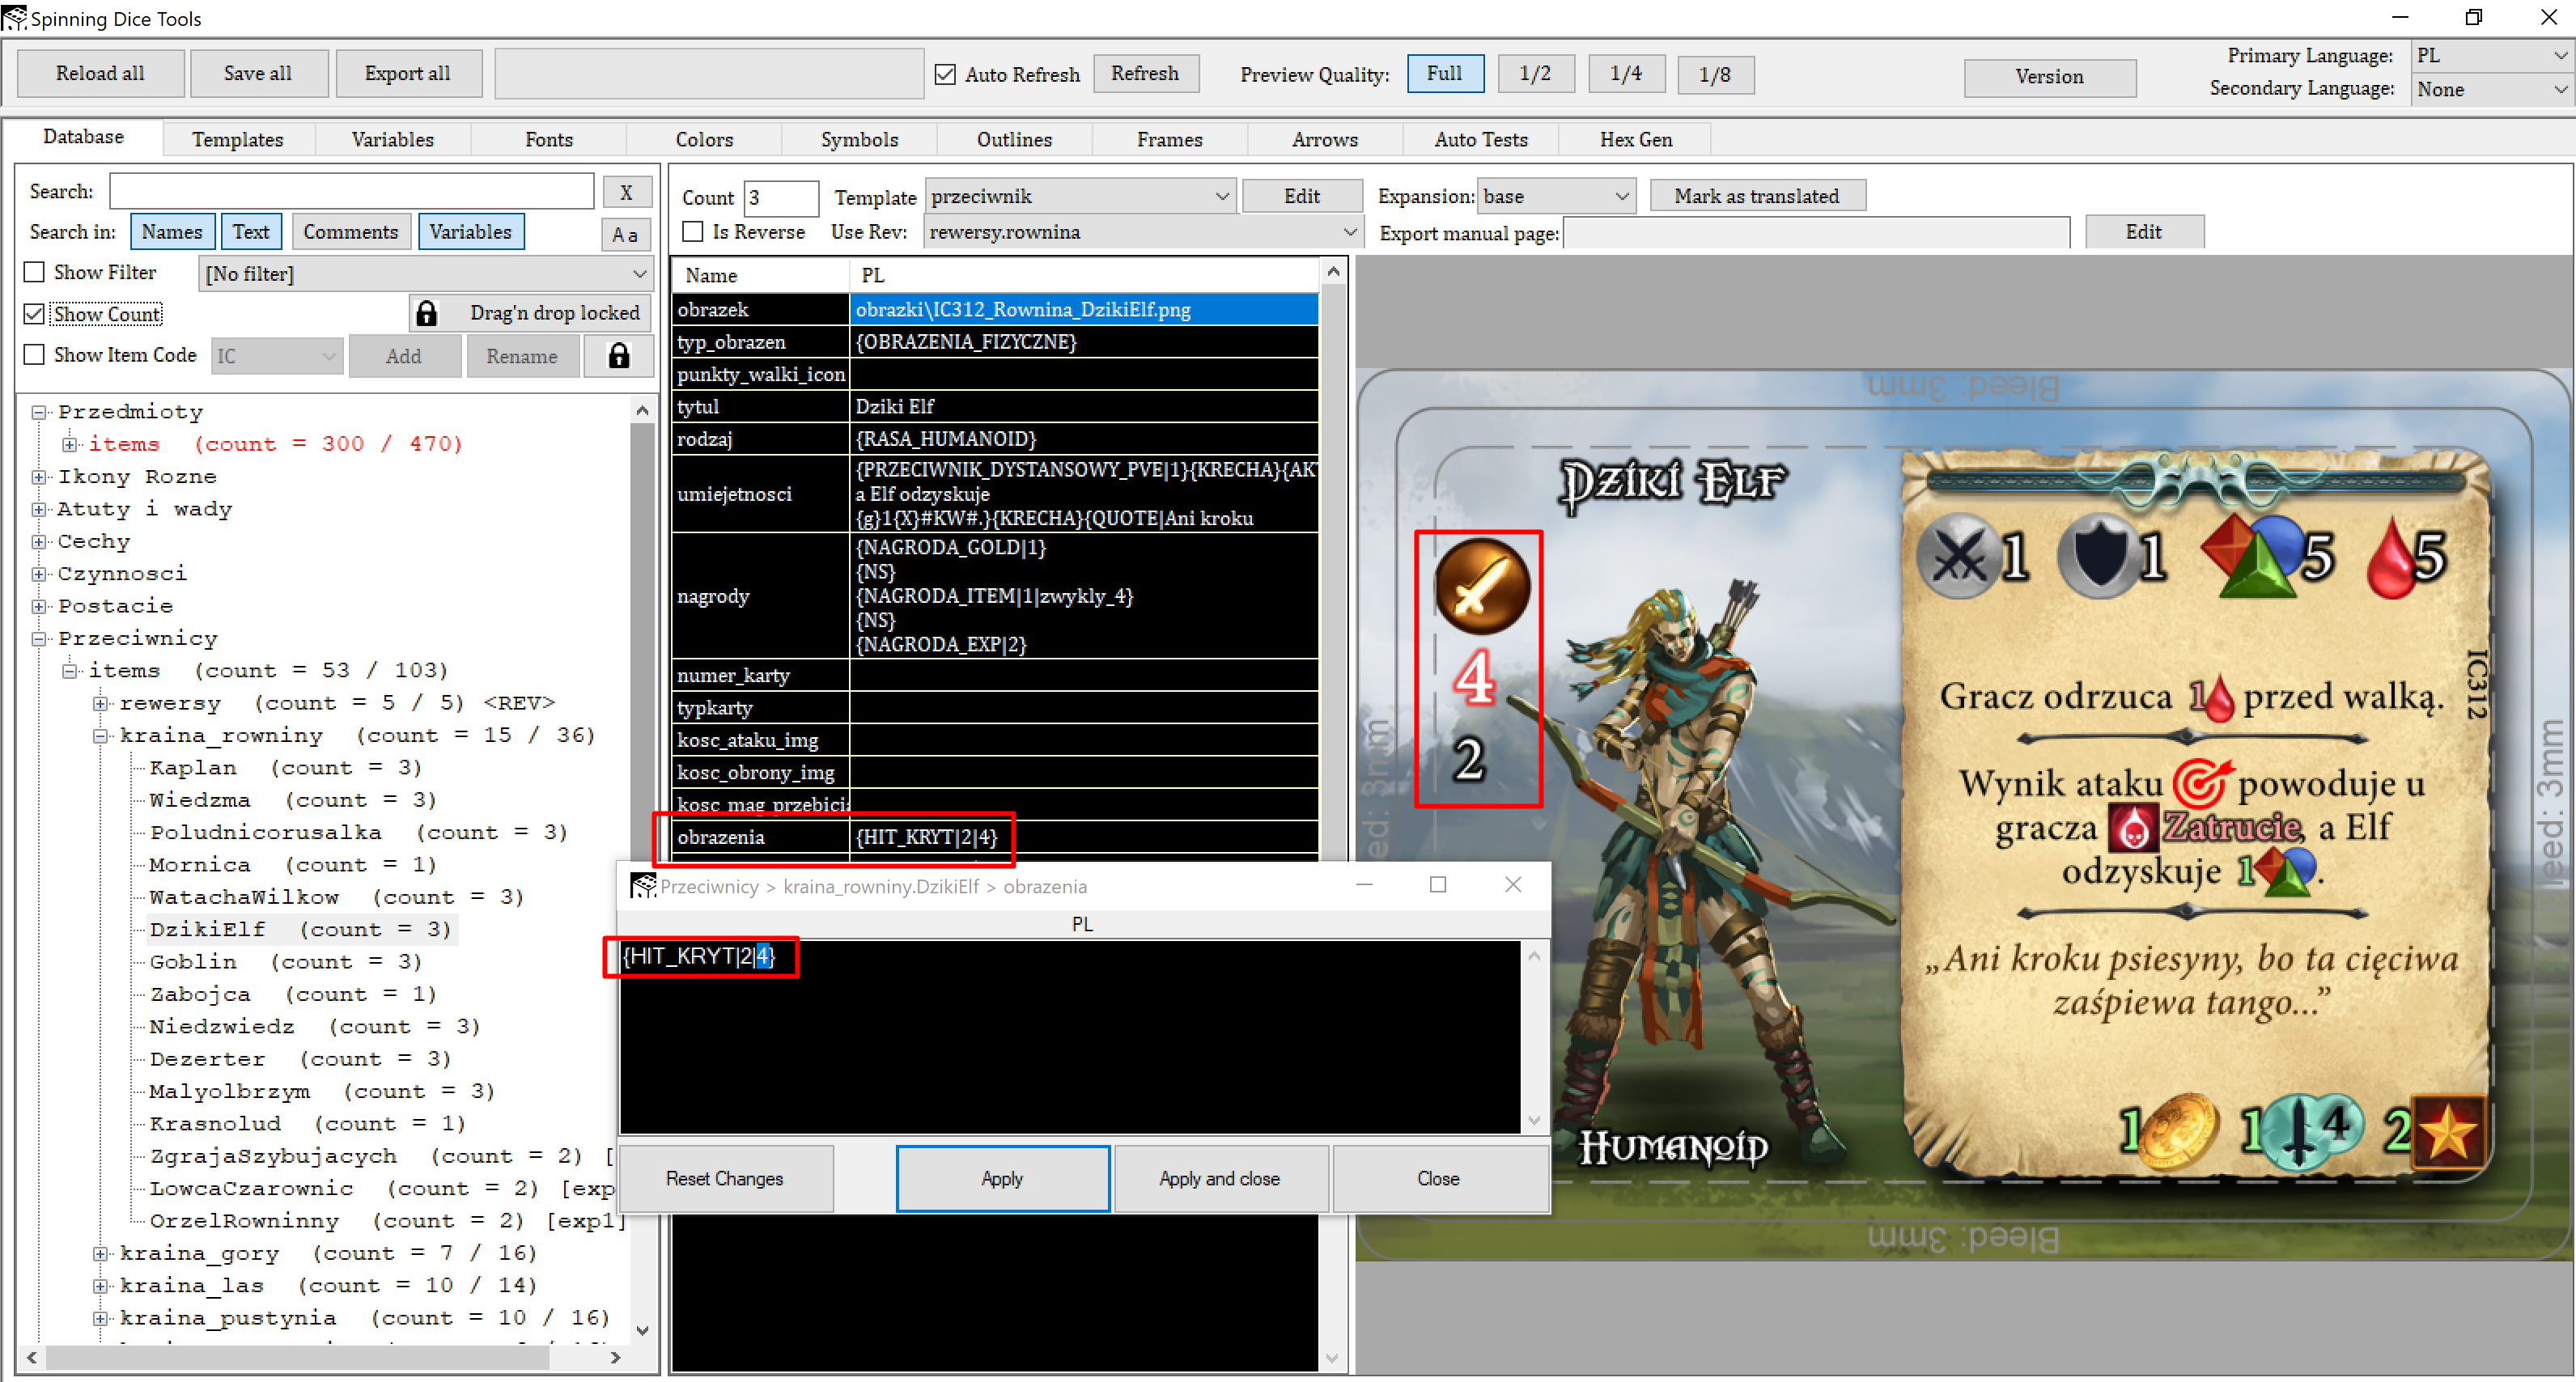
Spinning Dice Tools has custom text printing, which means that you can insert icons into the text by using special keywords.

We make a database of all icons that we use and give them unique short names. Then we type that name between two # symbols to show that icon in the middle of any text. For example “Take 1#gold#.” There are many formatting rules that give us full control of how these icons behave, like offsetting, scaling, or showing not only between the words but also under the text!
Besides the custom icons, we can also change the color of text (also short chunks of it, not only the entire text field), custom outlines, styles (like bold, italic, underline), text rotation, custom frames under the text, etc…

References and Consistent Naming
Another very powerful thing in the Spinning Dice Tools is the Variables system. A variable is some sort of a macro that allows us to wrap any text into a keyword.
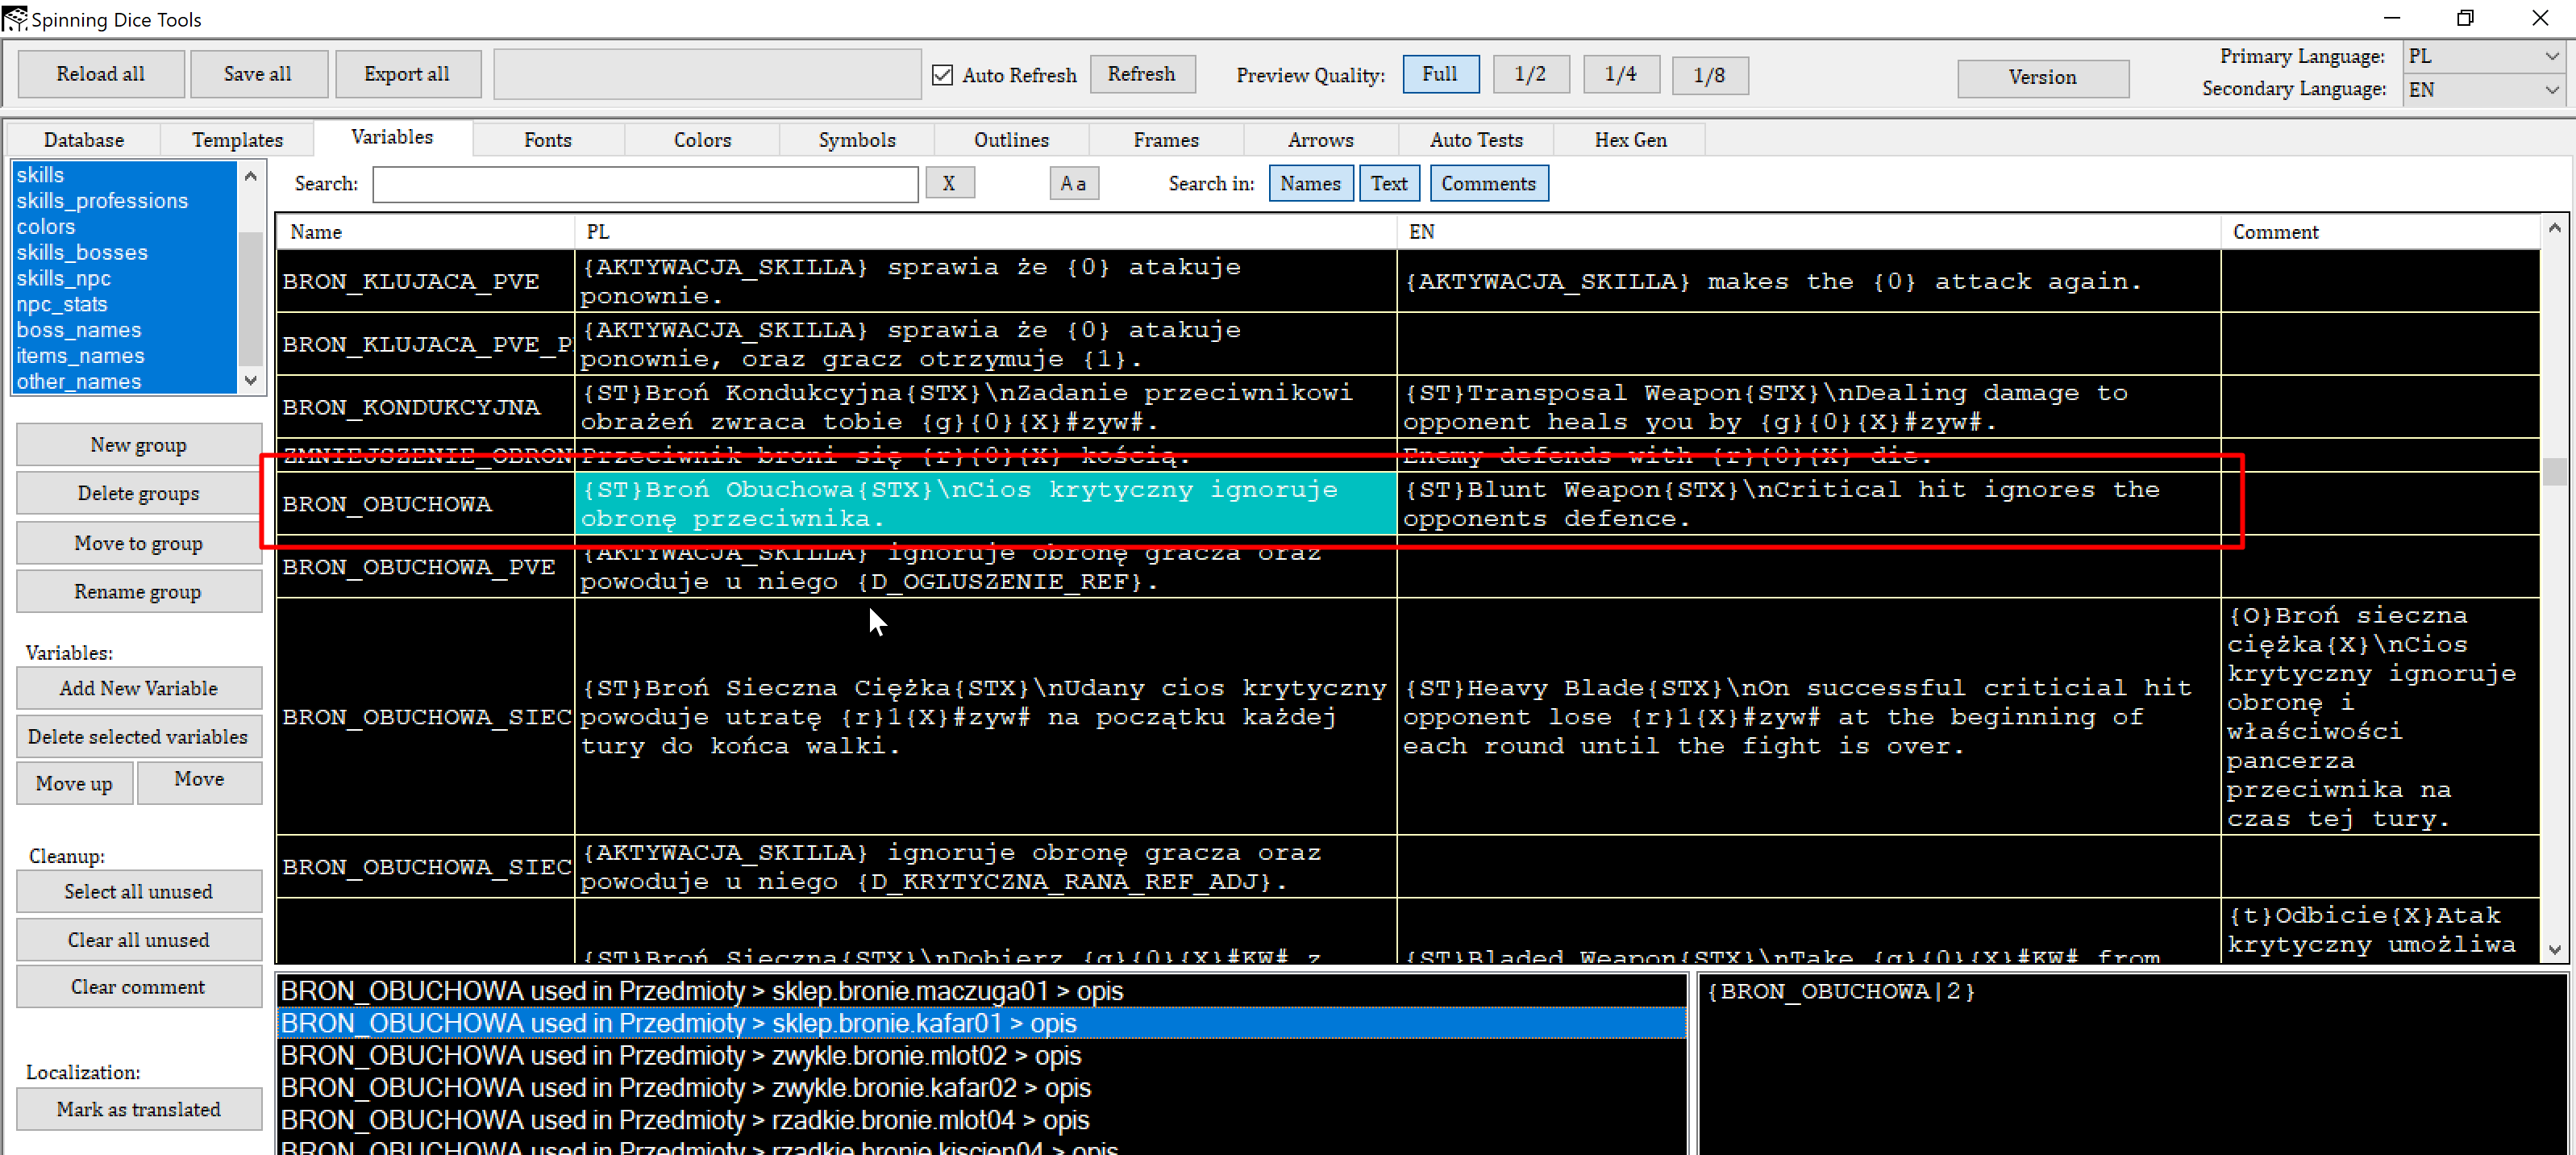
Above, you can see a page where we manage all variables, with for example a variable that we use to define the “Blunt weapon skill”. The tool has a very handy feature. For every selected macro, it immediately makes a list in the bottom window of all places where that macro is used. The context in which it’s used is in the bottom-right corner, and double clicking the entry takes us to that place in the database tab where it’s referenced. This saves a lot of time.
We have many cards that are blunt weapons with the same (or similar) skill. In order not to repeat the same text all over again on each card, we write a macro name between curly brackets { }. So in this case it’s {BRON_OBUCHOWA} which means “Blunt weapon” in Polish. This way if we want to change the skill for blunt weapons, we edit it in just one location (for all languages of course).
That’s not all about the variables. They can have “arguments” which you write as a number between curly brackets.
Example Definition:
SOME_VARIABLE = Some Text {0} with arguments {1} inside.
Example Usage:
{SOME_VARIABLE|ABC|123}
The result:
Some Text ABC with arguments 123 inside.
This allows us to make cool things like for example:
SKILL_INCREASE_PHYSICAL_DAMAGE = Increase damage by {0}#of#.
Then we can use the same variable on many different cards with different values depending on how powerful an item is:
{SKILL_INCREASE_DAMAGE|1}
{SKILL_INCREASE_DAMAGE|2}
{SKILL_INCREASE_DAMAGE|3}
The applications are endless – we use variables also for defining visual styles of texts. Something like a CSS to your HTML 😉. For example:
SKILL_HEADER_STYLE = &some_outline&§y{0}§!&!&
SKILL_THRUSTS = Powerful Thrusts (in English)
SKILL_THRUSTS = Potężne Pchnięcie (in Polish)
In the above example, the header style wraps whatever argument (text) you use {0} with a specific outline style, and makes the text yellow (§y).
And usage:
{SKILL_HEADER_STYLE|{SKILL_THRUSTS}}
Yep! Variables can use variables in arguments, and variables can use other variables in variables 😛
Okay, I feel like I’m getting too excited over details, so I’ll cut it here.
To summarize – the variables system gives us the ultimate control and management of the content. I can also mention that the variables system is the key feature that allows us to hook in the automated test (so the computer tests the game for us, by following their variables names to understand which card contains which skill). But I’m planning to dedicate a separate development diary post to that in the future.
Printing
So… all that sounds cool, but what about the printing process? Well, there is a section that allows exporting all of the content to graphical files. Those files are never pushed to the server, because that’s a lot of disk space. But we generate them locally on the PC that is going to prepare everything for printing.
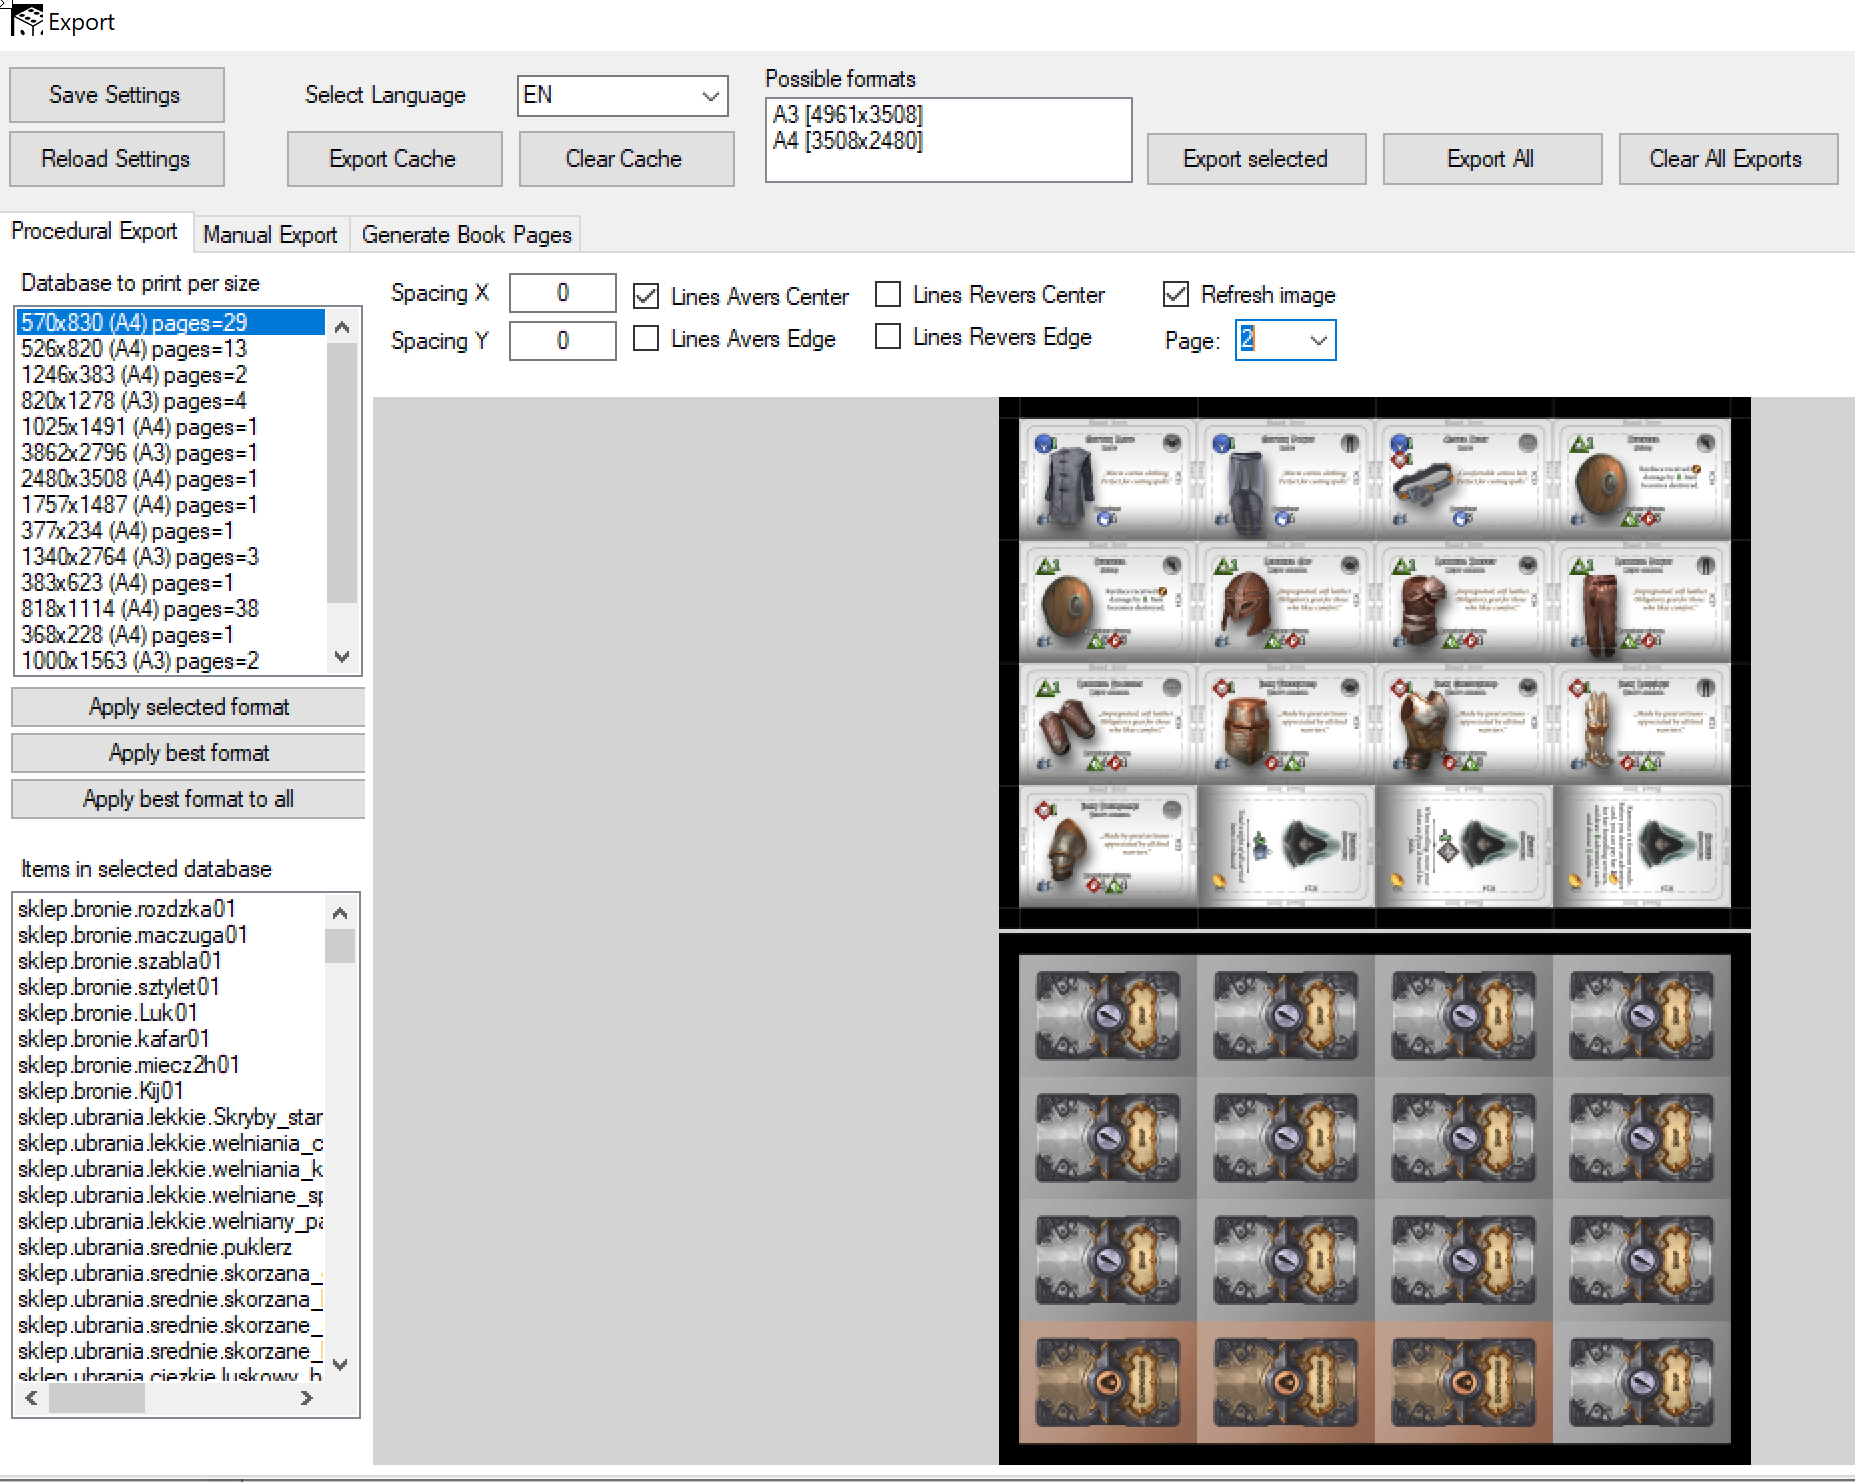
In the above example you can see a page where our tool is automatically preparing all the cards for printing in any desired format. This is very useful if we want to print the game in-house by using a regular home printer. The program automatically decides on the best orientation (horizontal or vertical) in order to use the least amount of pages, and generates both sides of each page.
We know that each manufacturer has different requirements when it comes to delivering the game materials. But having an own tool gives us flexibility – we can add/change anything in that tool in order to make it work with whatever manufacturing demands. Does the manufacturer want each card to be a separate PDF file? No problem, we can add that.
Another section of the exporting tool allows us to manually place stuff on the page.
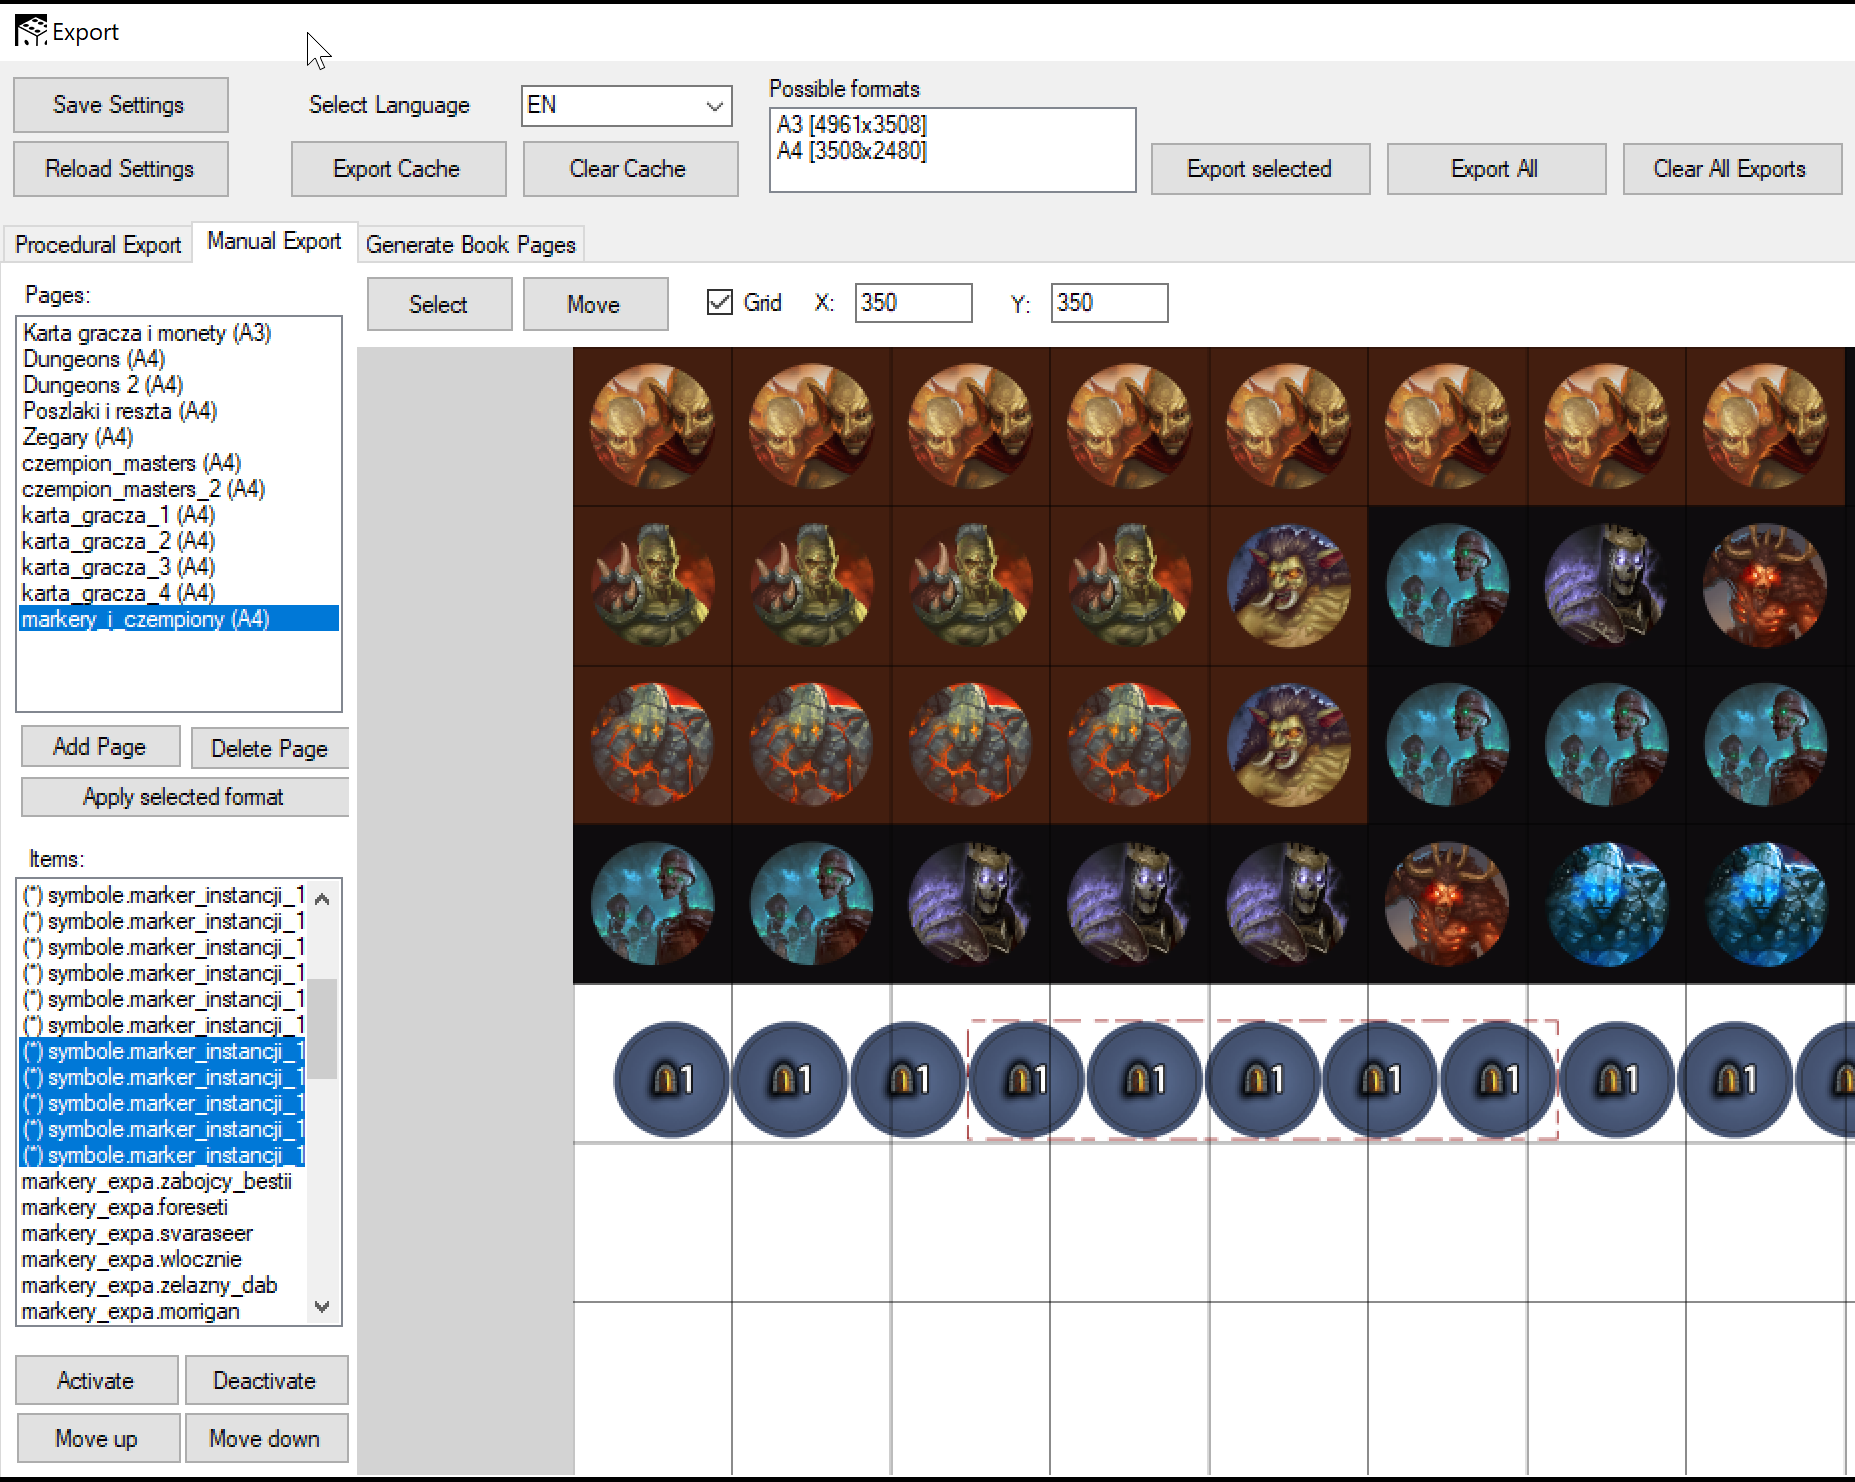
We find it useful in designing the punch boards.
Summary
The way we work is nothing new in the development world. We didn’t reinvent the wheel, because our development pipeline looks very similar to how computer games are built. We’re sharing it to show you that we’re doing things right, and that you can count on us delivering you top quality content in the Descendants of Volos board game.
That’s it for today. Thanks for reading, and “Let the Snaaga be with you” 😉